
You’ve found some products that you want to list for sale on Amazon. So what happens next?
You guessed it. The next stage of the process here, is to get them shipped in to Amazon. You won’t be able to list these until Amazon have received them, so it’s vital to get them prepared and sent in straight away.
In this article, I’ll be showing you the full process for sending your items in to Amazon FBA.
It’s not straightforward, and I’d definitely advise you to follow this below shipment guide so that you can ensure that you’ve completed it correctly.
I don’t mean to scare or worry, but you can do it wrong. This will attract increased fees from Amazon, or at worst case scenario a lost shipment entirely. You don’t want a full write-off of your inventory, so I’d definitely get to grips with this guide.
Fortunately, I have made this guide detailed to the point where it explains every single step of the process.
So, carry on reading for your 10 Step Process to sending a shipment to Amazon FBA.
What is Amazon FBA Fulfilment?
FBA Fulfilment is the way that many 3rd Party Sellers can sell on Amazon. It’s designed to make it easy for both buyers and sellers.
When you sign up to Amazon FBA, you will be required to ship your goods to Amazon before actually selling it. The good news; you don’t have to worry about marketing it, or actually posting it out to the customers address.
With Amazon FBA; Amazon do all of the leg-work. They pick, pack and deliver the items.
All an FBA seller will be required to do, is let Amazon know what products you want to sell, box them up & send them off to the fulfilment centres around the country. It’s a hugely popular platform and there are numerous advantages, including:
- Selling is completely hands off. You don’t need to worry about shipping items to individual addresses.
- You can reach a global audience using Amazon’s brand.
- Amazon FBA will handle all customer queries, including returns and refunds.
- You get the all important Buy Box. This encourages Prime Customers to purchase your item and receive next day delivery.

It’s really growing in popularity, due to the amount of potential that FBA contains. It’s one of the best passive income streams that you can build.
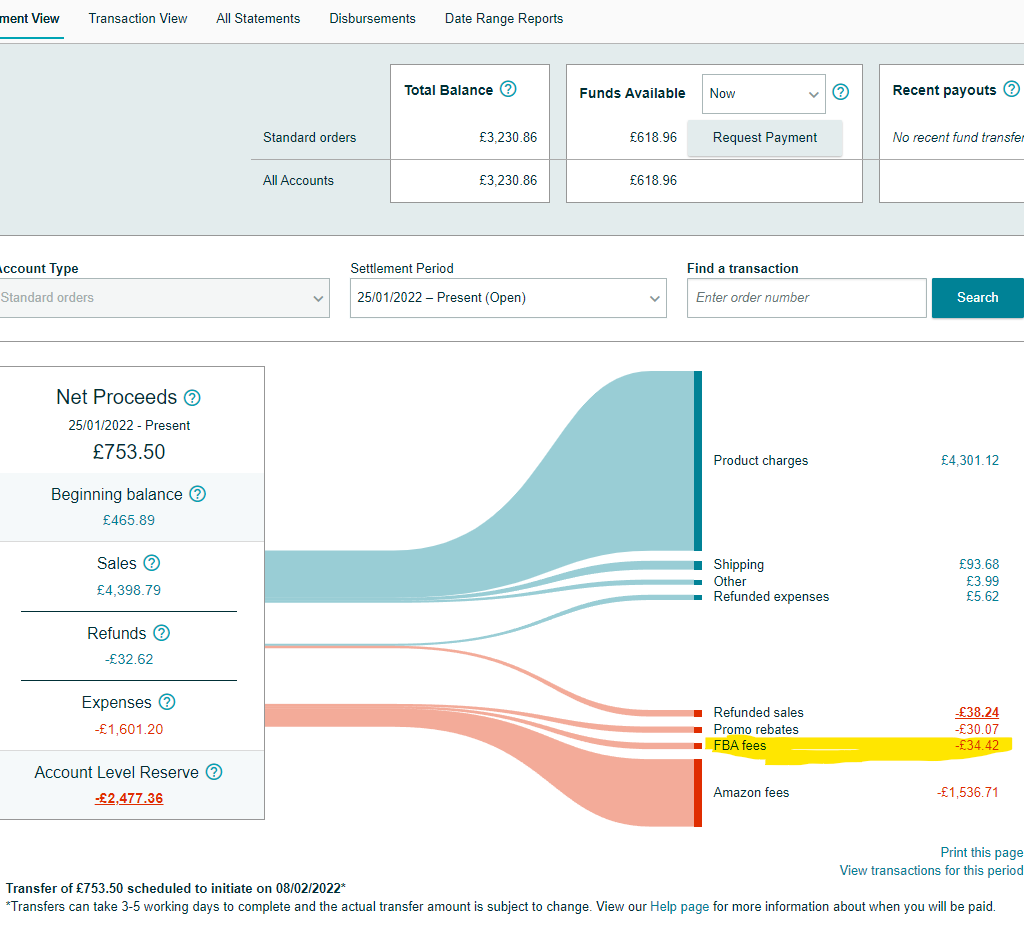
How much does Amazon FBA cost? Amazon Fees Explained
There are quite a few fees which are implemented within Amazon FBA. However, don’t be alarmed that these will eat your profits.
I have found that Amazon FBA fees are quite reasonable. Yes, they take their chunk, but leave enough for us to make consistent and worthwhile profits.
Some of these fees do vary, so lets break it down quickly before we send our shipment off together.
The first fee, is called a Fulfilment Fee. This is a charge per unit that you sell… which will vary by the Product Category, Size and Weight of the item.
The second cost is a Storage Fee. This is charged for all units, which are stored in an Amazon Fulfilment centre. This is measured in cubic feet.
There are extra fees which can be included such as the Dangerous Goods fee, or the Long Term Storage Fee.
Step By Step Guide: Sending in an FBA Shipment to Amazon
So, how does sending in a Shipment work? Whilst it’s not tremendously difficult, you’ll definitely feel more comfortable if you can walk through this at a slower pace, which is why I’ve created this step-by-step guide.
Sending in your products to the Amazon Warehouses isn’t a small feat, and it’s worth noting that you can make mistakes.
The pre-step is going to be creating your Amazon Seller Account, but I’m going to presume that you’ve already done this if you’re looking at sending your shipment in.
Step 1: How to Add A Product to Your Inventory
Before we can think of sending items in, we need to get these added to our inventory list.
This will become our Hub which shows a wide range of products that we are selling. Note, this will include all items that you have ever sold, or applied to sell in the past.
If you are adding your first product, your inventory will be empty.
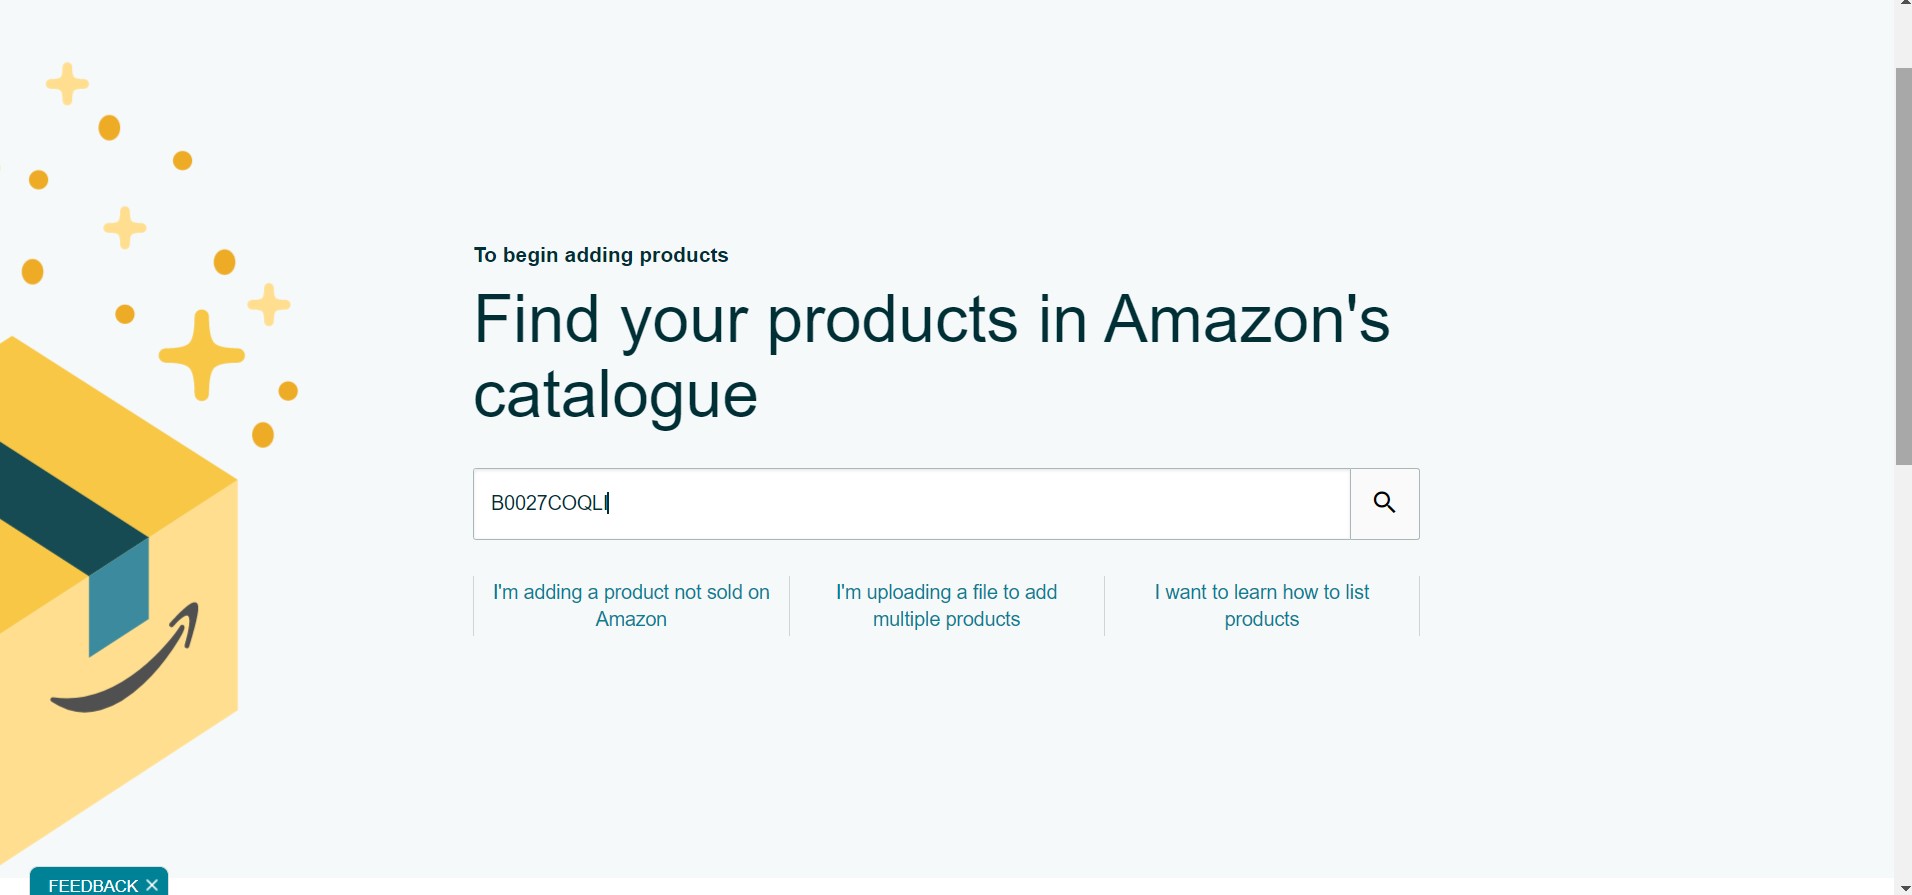
To add your product, simple press the Menu button, select catalogue and choose Add Products.

The next page that loads up will have just a simple search bar on it. You can also upload a file, but I’d always advise individual ASIN’s to ensure that the correct item is added. It doesn’t take much longer than generating a sheet, either!
At this point, you will be asked to add the item number, which is the Amazon ASIN.
You can also just use the item title, but this can find incorrect variants, so I would always advise that you use the ASIN.
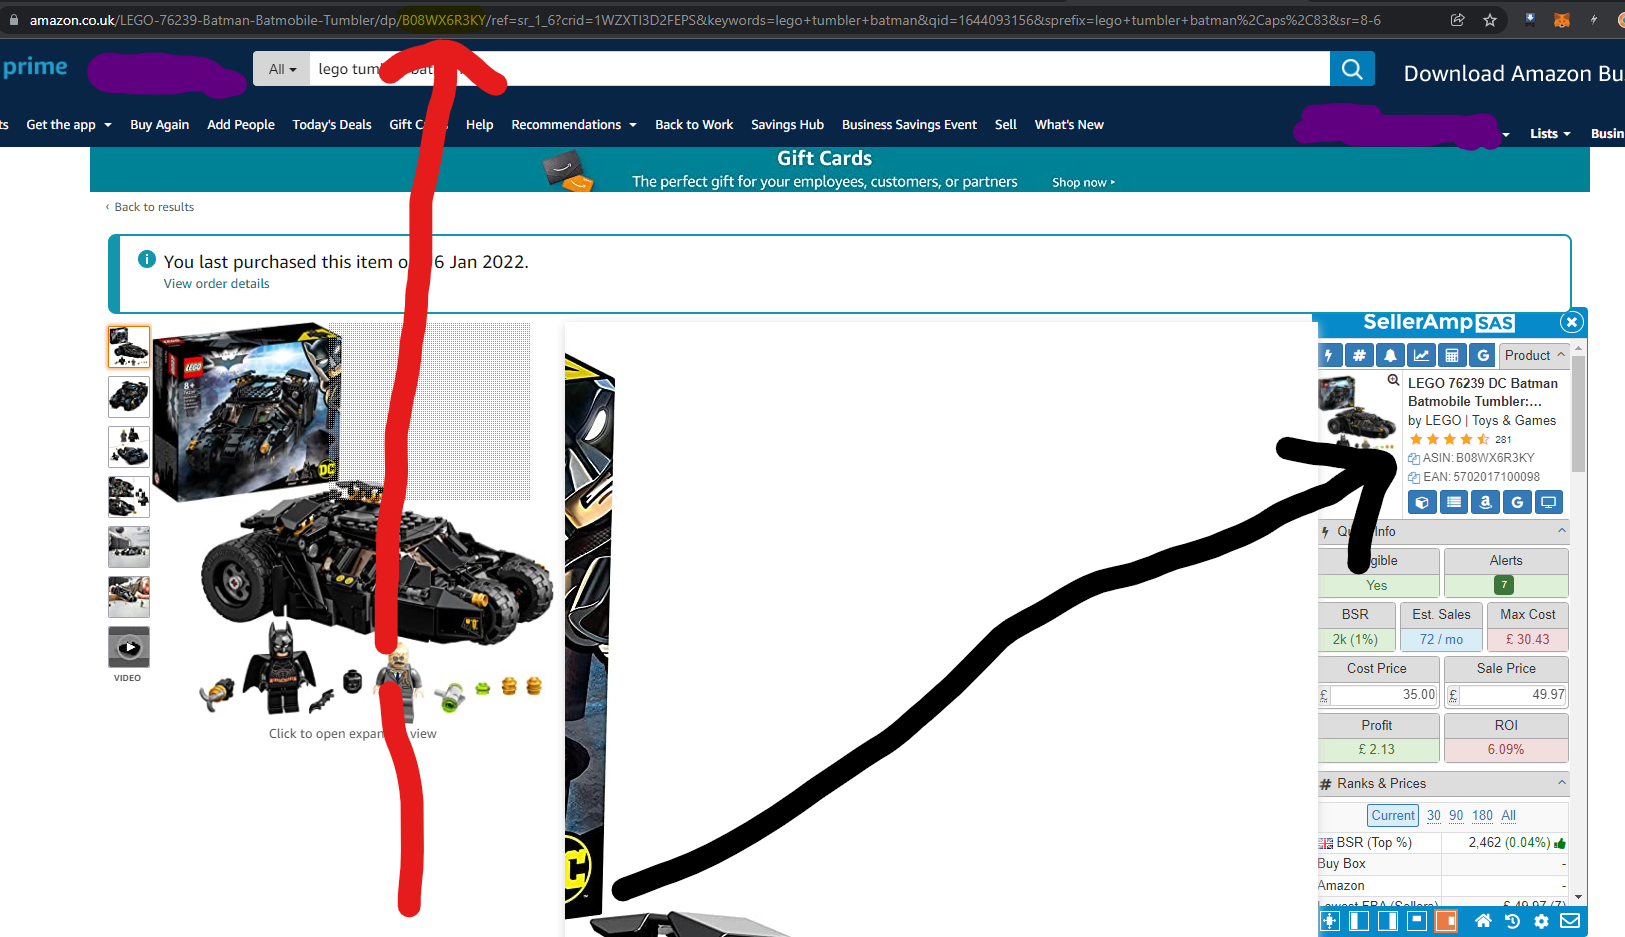
Step 2: Find the Amazon ASIN
If you use Selleramp, you can get the ASIN pretty easily from their Chrome Extension. It’s also just as easy looking for the ASIN on the Amazon Product Page.
I’ve added a picture below, with two coloured arrows. Black; Selleramp. The other, red, is the natural ASIN from the Amazon URL. If you enter this on the Add Product page, it would take you directly to the Lego I’ve randomly selected below.
Step 3: Select the Item Condition
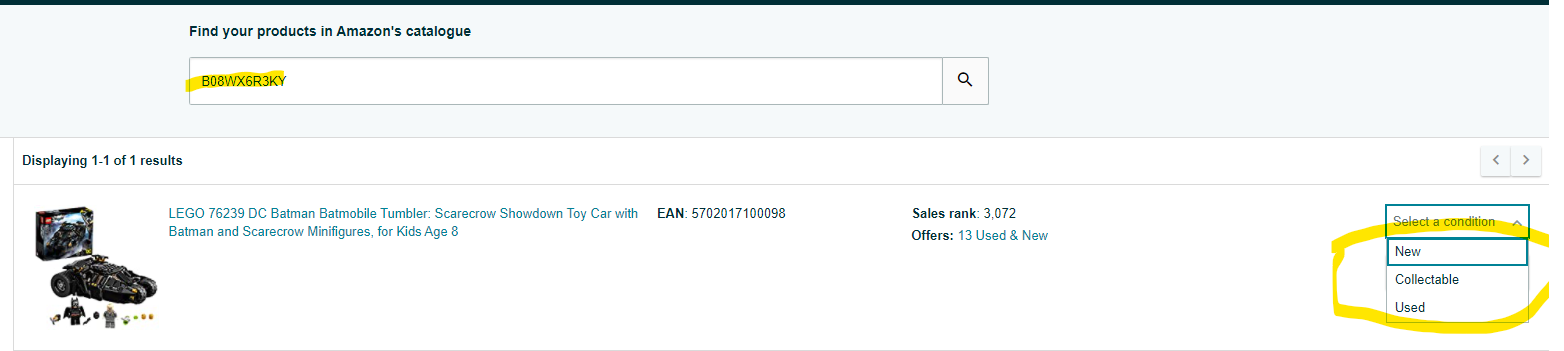
Once you’ve found the ASIN and pressed search, it should take you to the page below.
ASIN searching is pretty faultless, but it’s still worth giving it a quick check to ensure the product is correct.
Once the item has been confirmed as correct, it’s time to continue. Select the Condition box, which will bring down a dropdown showing New, Collectible and Used.
With Amazon FBA, we will be dealing mostly with New items, so in this instance we will be selecting new.
Just in between steps, I thought I would show you an alternative button that you may see. This only appears if you are Gated.
You may have to Apply To Sell specific products, or even specific categories as a new FBA seller. This is a fairly straightforward process of sending invoices in to their Customer Service team, but I discuss this more in detail in the Ungating Guide. Below is the Gated button.

Step 4: Prepare Your Inventory for FBA
There’s a good chance that your first shipment may only contain one or two different items. You may have multiple units of this, but it’s probably best to keep your first one smaller so that there’s minimal room for error.
Once you’ve added the product to your inventory, it’s time to Prepare to send this in. Navigate to your inventory by selecting Inventory > Manage FBA Inventory.
This will show you any item that you’ve previously added to your inventory, like above.
You probably won’t have many items here for your first shipment, unless you’re going all-out from the start.
Select the items that you want in your shipment by selecting the tickbox towards the left of the item image.
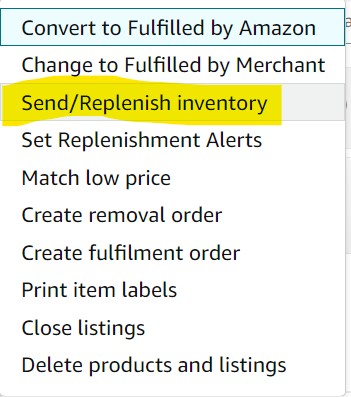
From this point, you can hit the drop down bar which I’ve circled just above the image. This is labelled as ‘Action on 1 Selected’.
(For reference, I’ve also circled the Price and Unit information which will become important down the line, as you start to sell more units).

Once you have selected the drop-down box, there’s only one option that we are looking for here.
Send/Replenish inventory. All of the other options don’t really matter at the moment, but will increase your efficiency when you have 100+ unique ASINs.
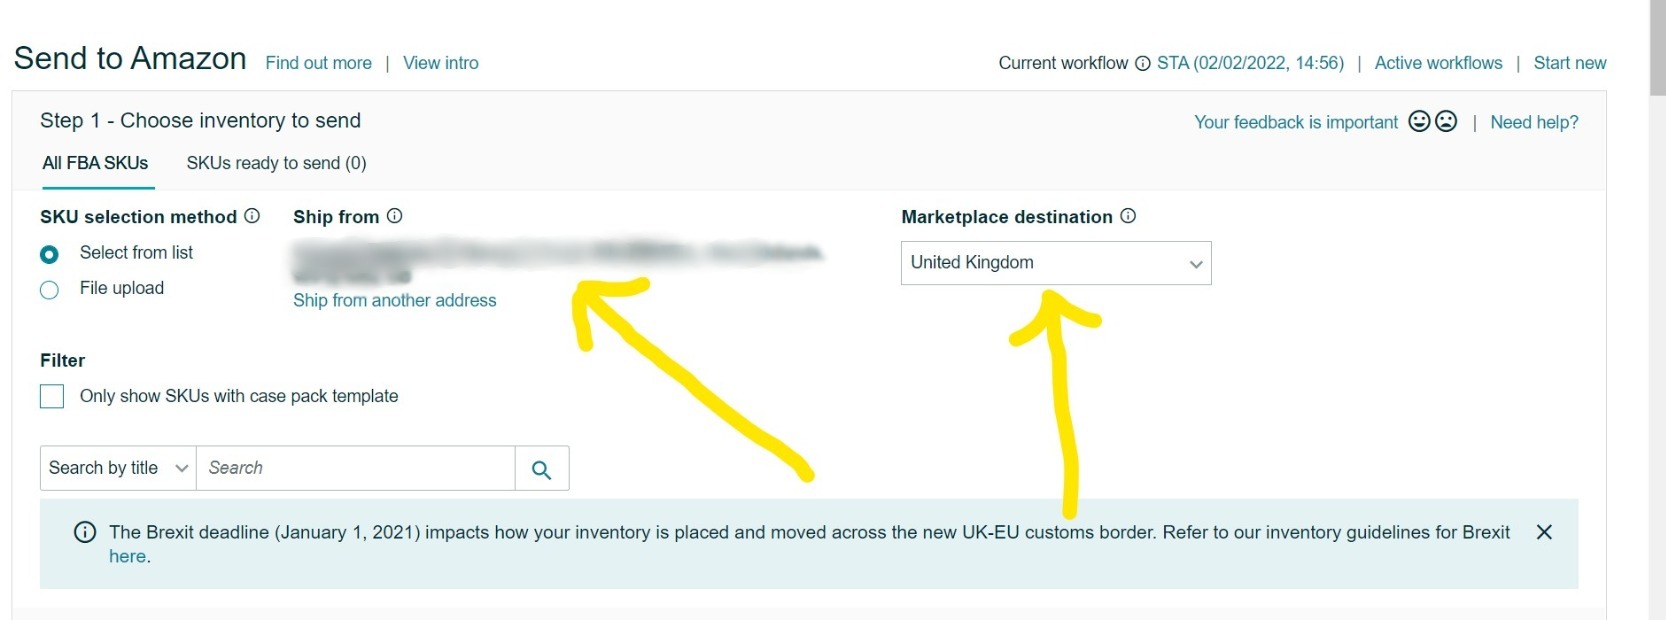
This is where things may start to get a little confusing, but you’ll soon get used to this. From my experience selling, there’s a lot of information on these screens but you’ll ignore or scroll past it 99% of the time.
It’s important to check that the Ship from address is correct, as this is where UPS will come to collect your shipments/packages. Also check that the Marketplace Destination matches your intended market.
Step 5: Selecting Preparation & Labelling Requirements
I’ve really broken this down into mini-stages, just to show you every single step. Although this looks like a long process, when you’re experienced you’d be able to complete a full shipment in less than five minutes.
The next step is to complete the preparation for your items. We are ok here with the Lego set as it’s boxed.
You’ll notice this says Prep Not Required. The only thing that we need to do with this one, is Print and attach the SKU Labels to the lego box.
I’m going to quickly move off-piste now and select another ASIN, to show you what a Prep Required item process looks like.

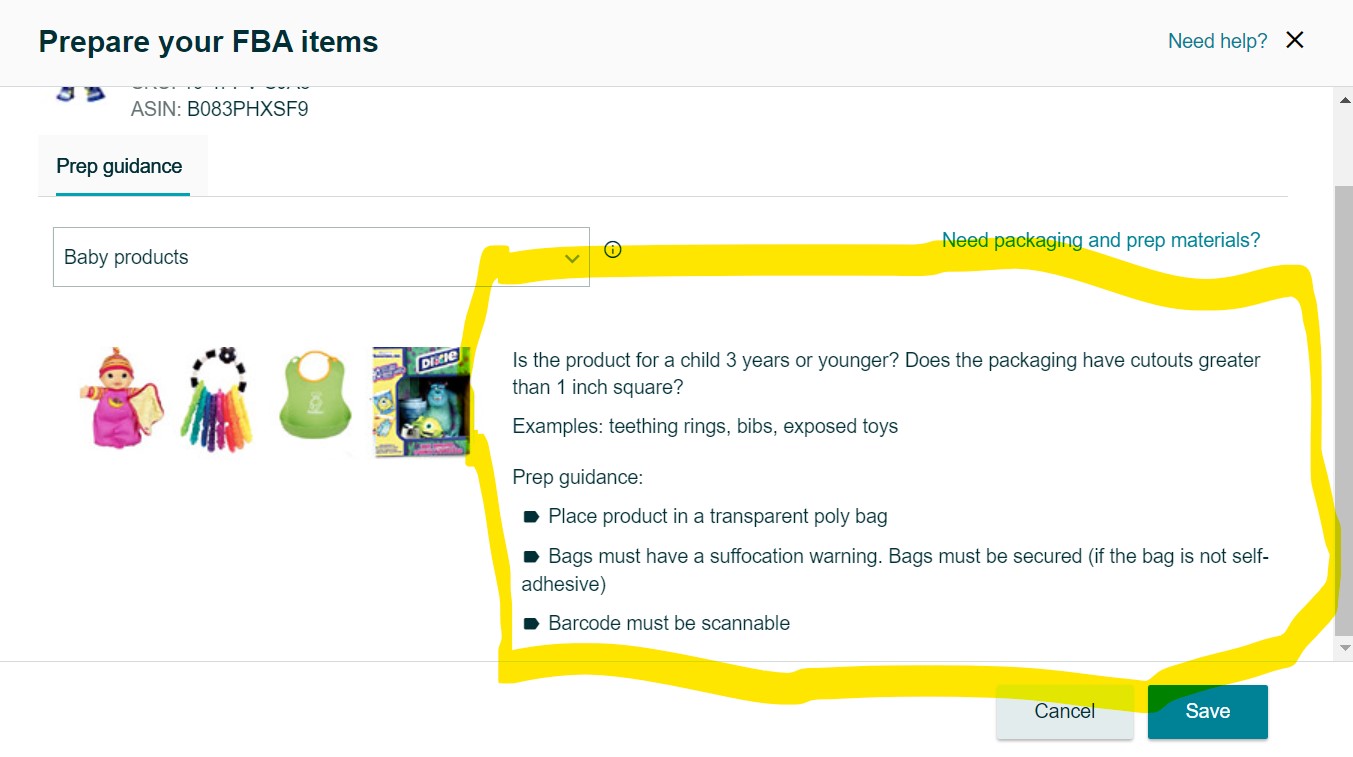
Some of your items will require preparation. In fact, quite a lot do. Make sure you’re stocked up with poly bags!
Baby Products & Health and Beauty products are the most common to require Poly Bags, to help protect the product against leaks and dust damage.
The Seller Account section is really good here, and Amazon even talk you through the prep guidance in case you aren’t too sure.
I’ve selected Baby Products below as the Prep Needed option, which shows you that it must be placed in a poly bag, with suffocation warning. The label is advised to be scannable, so I’d place this on the outer poly bag.

If you don’t have time or want to outsource the work to Amazon, you can select for Amazon to Prep and label the units.
Personally, I think that this is expensive and will eat into your profits. However, it’s completely your decision! Below, I would select that the Seller labels and prepares, but this is where you can select for Amazon to do the work.
After confirming that the item is prepared and how many units you’re sending in, you’ll see a button showing Ready to Pack.
You’re almost there!

Step 6: Printing SKU Labels
One of the latter stages is to Print the SKU labels. These are the labels which will help Amazon to identify what the products are, and then account for them in the warehouse.
It’s super important that you get this part right. Amazon have no further input into the labels once labelled.
If you label a PS5 as an Xbox One, and a customer purchases an Xbox One… they could be sent your PS5.
So you will have two options for printing your SKU labels.
You can print them all at once in bulk, or you can print separate SKU labels per unit.
Printing in bulk will be a lot faster, but make it a bit easier for you to make a mistake. However, printing individual SKU labels will really add to the time per shipment, especially if you aren’t using a Label Printer.
At this stage; I’d highly recommend a Label Printer as one of your most important supplies for Amazon FBA. Put it on the expenses!
I personally print bulk SKU labels, and separate them into batches once they’ve printed off.
The process works for me and I teach others to use this method too. I think it works for them too!

Step 7: Packing the Boxes
There’s very little documentation on Amazon FBA beyond the Amazon website itself, but there’s some key things that I wish I learnt at the very start. It resulted in many wasted hours on the below screen.
Do you want the secret info that could save you hours?
Don’t worry, I won’t be asking you to buy an e-book or subscribe to a monthly service.
Quite simply; Do not use a Box that exceeds 63.5cm. Do Not exceed 23kg in weight.
Honestly, the amount of times that I have been packing items and then the form has declined the whole shipment due to the weight… all because of those two bold facts above.
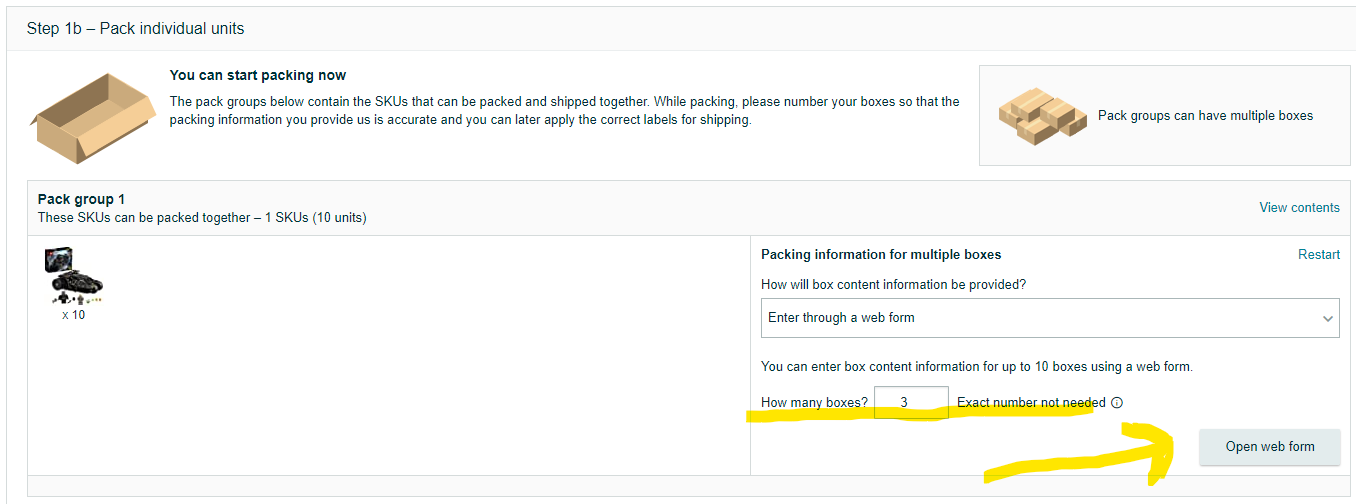
When you’re packing your items, Amazon will ask you a simple question.
How many boxes will these units fit into?
You can select one box, or multiple boxes required. This is known as your Shipping Plan Workflow.
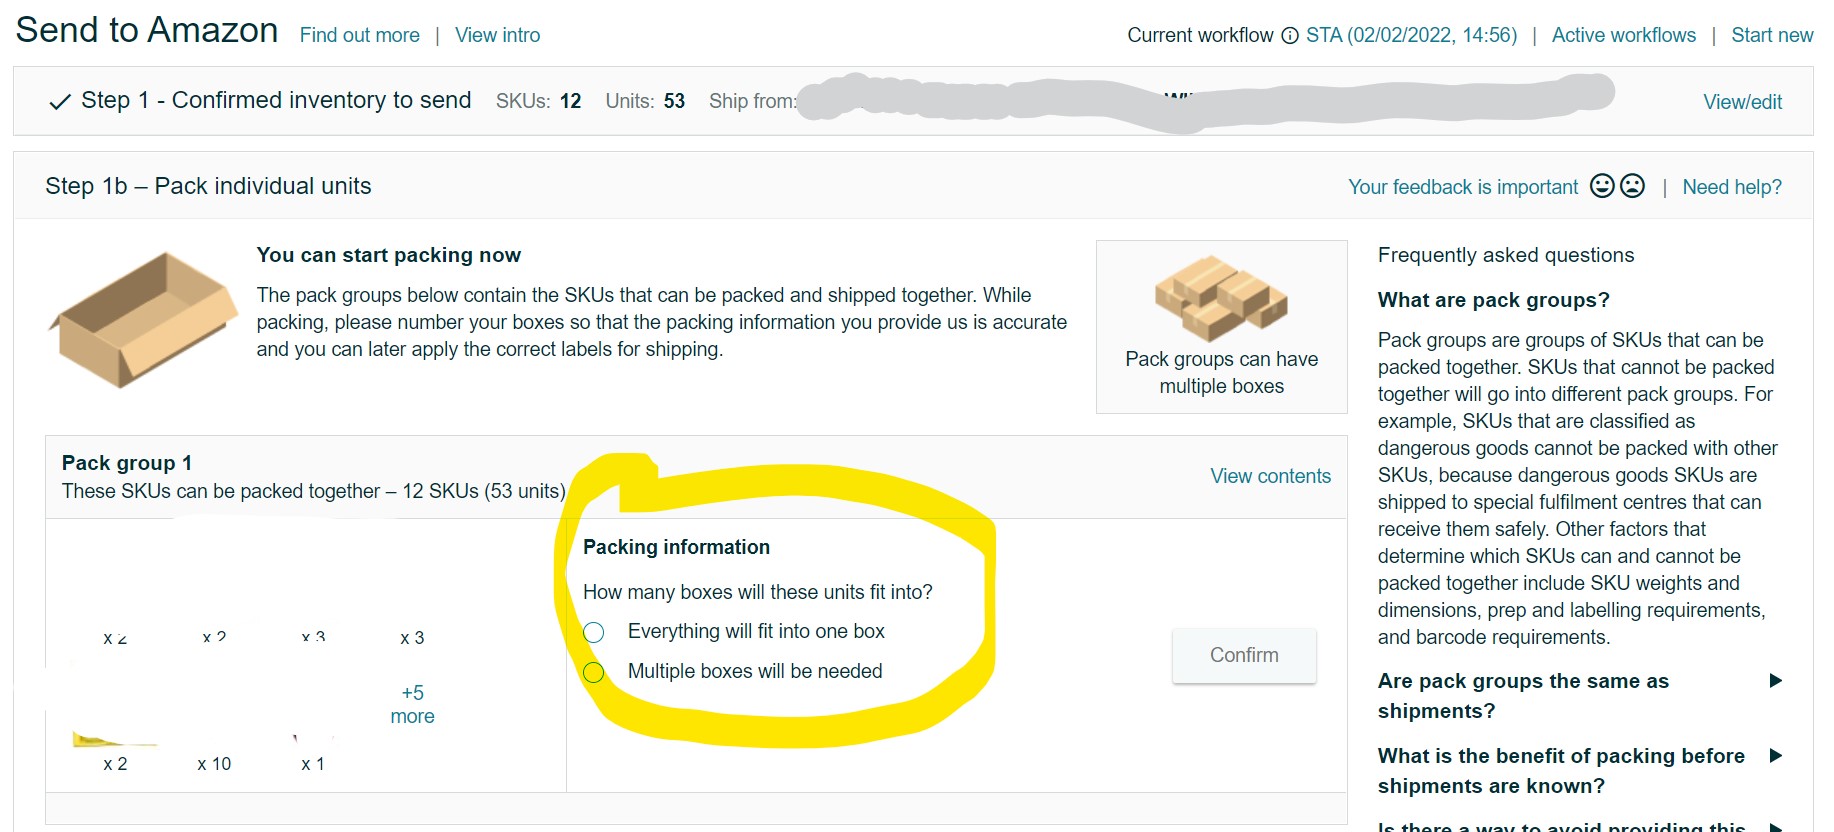
If you select that Multiple boxes are required, you’ll be asked to fill in some extra information. It doesn’t take too much time, but you’ll need a tape measure and some weighing scales.
Enter how many boxes you will use and click Open Web Form.
I’m aware this article has been pretty long to read, but I’d rather give you too much information, than missing out vital parts that leave you even more confused than when you started.
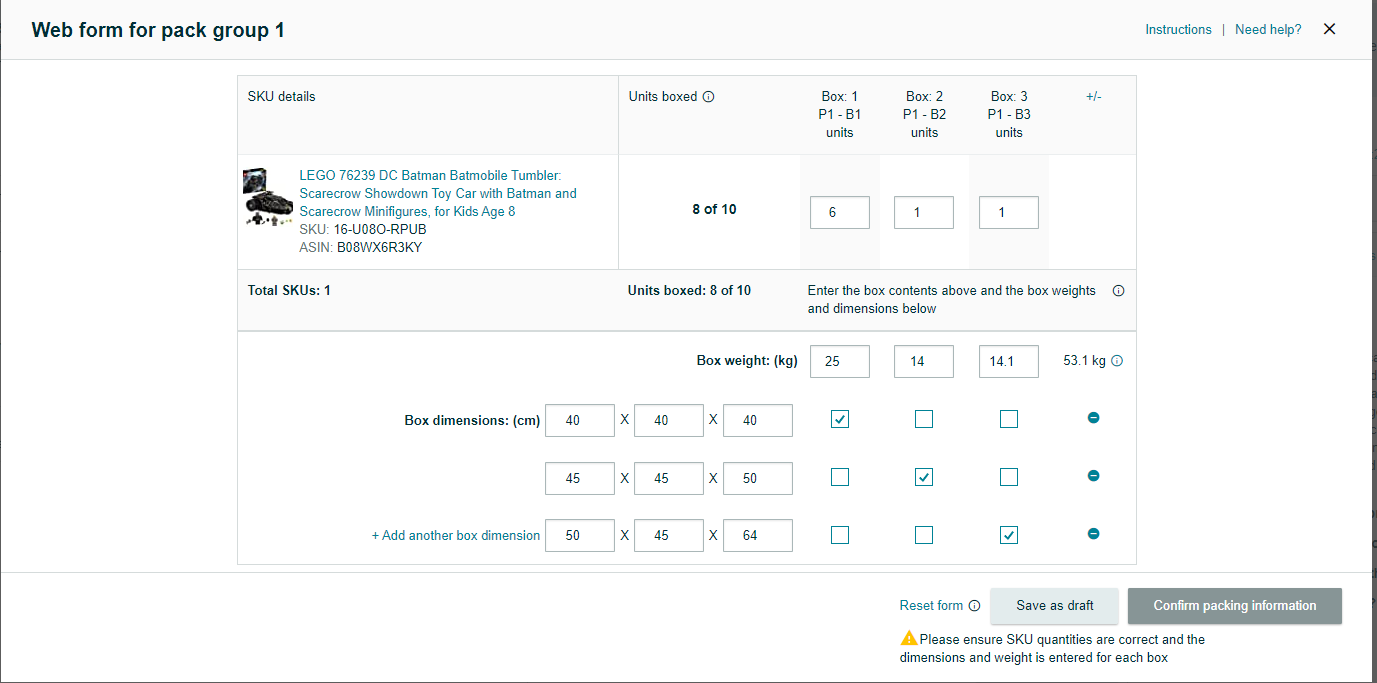
For that reason, it’s time for a little game. I’ve entered my web form for my Lego shipment, but I might have done something incorrect on it.
If you’ve found out what I’ve done wrong, let me know in the comments.
I have selected three boxes for this shipment, which are labelled in the header of the table.
You are required to enter the information such as how many units are inside each box, in addition to the weight and dimensions of each box.
Please measure and weigh these, Amazon are known to add fees if you don’t advise correctly. After this, you can confirm packing information to continue.
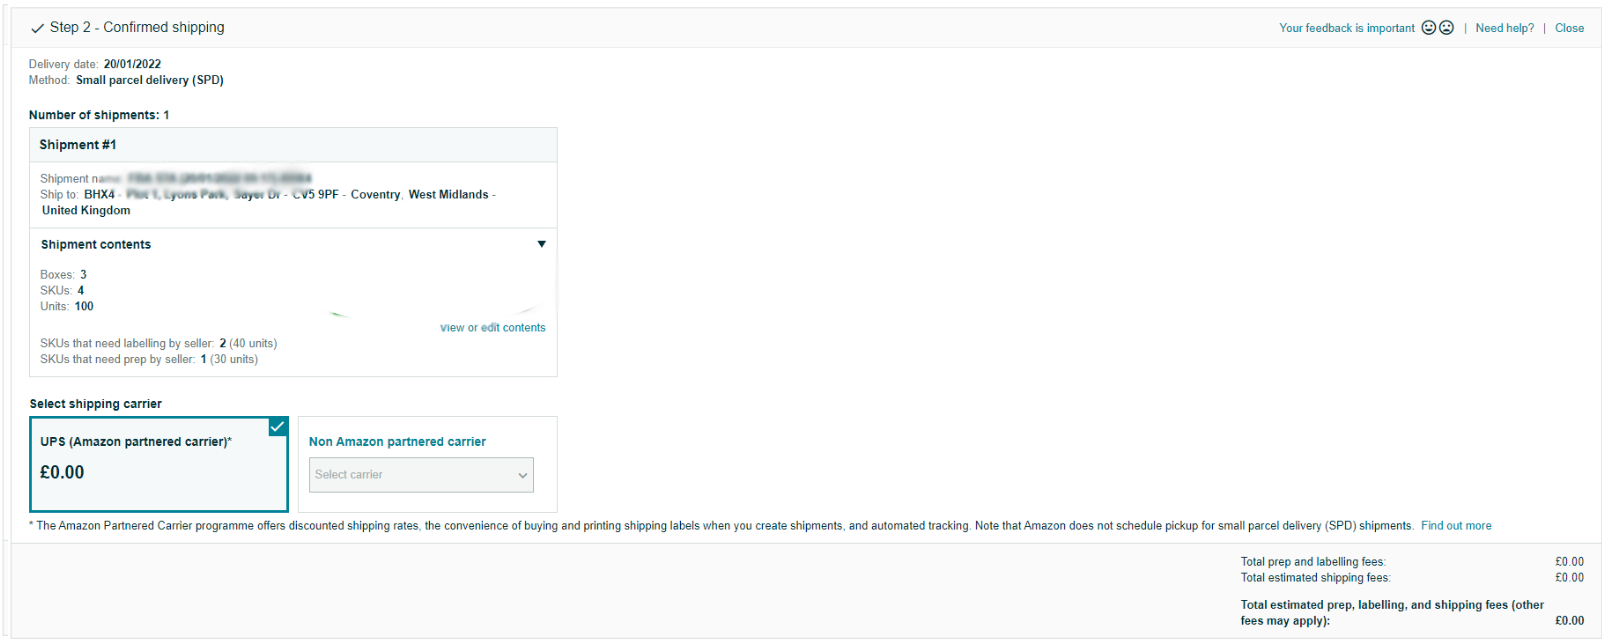
Step 8: Confirming Shipping
Next up, it’s time to confirm the shipping information and select our shipping carrier.
It’s at this time, that I must point you in the direction of the New Seller FBA Selection Programme. This will enable you to earn Free Credit, which will end up saving you £80 in shipping fees alone.
Wherever possible, you should be using UPS Partnered Carrier option for your shipping carrier. This is heavily discounted, and heavy boxes will cost less than £5 to ship out.
For categories such as Dangerous Goods labelled ones, you will need to use a Non Partnered carrier.
Step 9: Print Labels
We now need to print our labels out and get them attached to the box.
If you have multiple boxes, ensure that you know which is Box 1, Box 2 and Box 3 or you’re going to waste tape opening these back up.
I tend to write B1 on the outer box, then applying the label over the top of it.
Each shipment will print out two labels, one is the UPS partnered carrier label and the other is for the FBA Shipment. Attach two labels to each box.

Step 10: Arrange Your FBA Collection
You’ve made it to the promised land. Your first shipment has successfully been booked. However, it’s not yet actually scheduled, as Amazon don’t offer this service.
It can be done completely free of charge though.
Take your UPS tracking ID from the below screen & head over to the UPS website. You can even “Google UPS Book Collection”.
If you enter the tracking ID for the shipment, UPS will advise that the collection has been pre-paid by Amazon.
This is actually not very well known, and plenty of people arrange a collection for the cost of £2.40.
Not to be Mr Money Saving Expert, but if you have 3-4 collections a week this little trick will save you £500.
All you have to do now, is wait for the UPS Truck to arrive. My local one always tends to arrive 5 minutes before the deadline, they leave me sweating every single time!
The final stages of this process will be Amazon checking the items into their fulfilment centres, but that’s really out of your control. Now you patiently wait, which means you aggressively source your next items!
I’ll finish this article off with some Tips and Tricks that I have found extremely effective when sending shipments in.
Top Tips when Sending Amazon FBA Shipments
- Make a Label Printer one of your first investments. These will power through with ease, saving you money on Ink and Cellotape… in addition to lots of time!
- Don’t use any boxes that are larger than 63.5cm.
- 23Kg is the maximum weight allowed. Don’t go over this or you’ll face heavy charges.
- Ensure the Barcode is always readable. If you see one and think “that’ll be alright”, just re-create the label. Leave no room for failure.
- Reduce the risk of incorrect labelling. Find a process that works for you. Again, A Label Printer will help with this.
- Use the FBA New Selection Programme to get a ‘free’ start to FBA. Who doesn’t want to save £100?
- Account for the fact that Dangerous Goods items do not qualify for UPS Partnered Shipping, which will mean more expensive courier costs.
- Book your collections using the UPS Tracking ID’s, which will save you £2.40 per shipment collection.
- Check the Shipment Destinations when you are asked to prepare the boxes. Sometimes, Amazon will require specific items to be boxed together. You won’t always have control of what items need to be boxed together.
- Always be careful not to mix liquids with things like Lego Boxes. This could lead to a lot of ruined product, in the event of a damaged parcel event.
Conclusion: How to Book & Send Amazon FBA Shipments
This guide should leave you confident and prepared to send in your shipment. If there’s anything else that yu have a query with, comments are always open for further assistance.
If your package is labelled correctly, you’ll notice that Amazon get this checked in much faster. This is key to getting your daily sales targets hit.
Inventory needs to be on the shelves in order to be sold!